BLOGGER TEMPLATES AND TWITTER BACKGROUNDS

Pages

Sunday, 27 May 2012

Ecraft Project card for MUM

Hi this is a really easy card to make and I made it for my MIL birthday but you could just change the letters and make it for anyone.


Ecraft machine
1 sheet of 12 x 12 Core'dinations card Pastels
1 sheet of 12 x 12 Tim Holtz and Ranger Distress Collection
Flower Fairies CD-Rom (Rose) Crafters Companion
2 sheets Satin Finish Paper from Crafters Companion
Scalloped Edge Heart image from Ecraft
Glue
Foam Pads 
Fundamentals 1
Glitter
Crafters Companion Ultimate Pro and Boxer board
Gems

PLEASE NOTE TO SEE THE SCREEN IMAGES BETTER JUST CLICK ONTO IT TO ENLARGE.
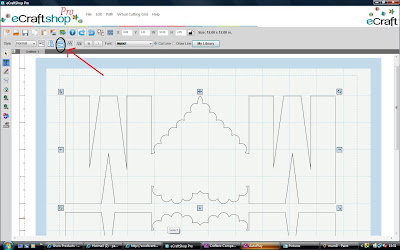
To design the card base open you mat in Ecraftshop pro software. Select the font your require I used Impact for this as it is a nice plain shape with the caps lock on, click onto the text button on the left hand side toolbar.


With the Caps lock on type the letter M. Resize this to 3.20" wide and 4.00" high. Copy and paste and move the second M to the other side of the mat.


Bring in your Scalloped Edge Heart Image, I personally deleted the drawn centre image as I am going to add a topper onto the heart. Resize your heart to 4.00" wide and 4.00" high. I found it easier to line these up if each one is level with the top of the second square on the mat.

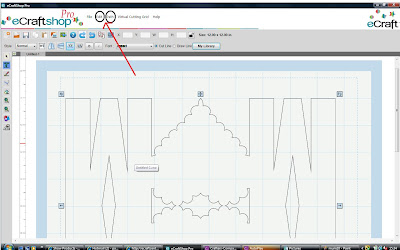
Click onto the heart and using the Kern+ feature on the top toolbar slowly move this towards to the letter M on the left hand side of the mat, until they just overlap.


Click onto the second letter M and move again using the Kern+ feature and move towards the hearts again so they slightly overlap.


On your top toolbar click edit, select all.


Again on the top toolbar click Path, Union.


Now click on Paste and Copy


Click onto the top shape and flip using the Flip Vertical button on the top toolbar.


Click onto the bottom image and using your Kern + button move it up so that it just overlaps the top image.


On your top toolbar click on edit, select all. Then click onto Path Union this will now join your images together. On the top toolbar change your style feature to shadow. Put your desired card into your Ecraft and cut out.


Fold your image in half and burnish with a bone folder.
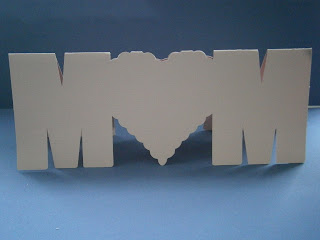
Bring a new mat into your Ecraftshop Pro and using the text feature on the left hand side tool bar and your font on IMPACT type two letter M's (don't forget these need to by with the Caps lock on) onto your mat, together with a Scalloped Edge Heart Shape. Resize your letters to 3.20" wide and 4" high and your heart 4" wide and 4" high. Make sure that your style is NORMAL on the top toolbar. Now cut these from your desired coordinating card or paper. For this I use a backing paper from the Flower Fairies Rose CD-Rom, Design 6 and colour 1 for the letter M and colour 6 for the heart. If you want to cut the flowers and heart in a different paper you will need to put them onto separate mats.

Using a new mat and your base cardstock make sure that your font in on Impact,  click onto the text feature on the left hand tool bar and with your caps on type the letter U, then resize this to 2.06" wide by 2.37" high. Then change your style to shadow and cut out.
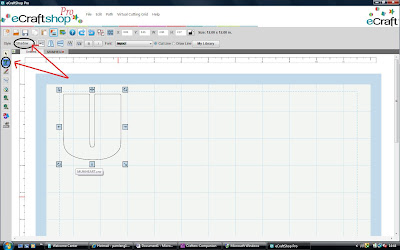
For the next layer I used my backing paper from the Flower Fairies Rose Design 6 colour 1. Keeping the letter U on your mat alter the style to normal and then cut out.

Place glue onto the back of both your letter M's and stick onto the card stock. Then place on your heart.
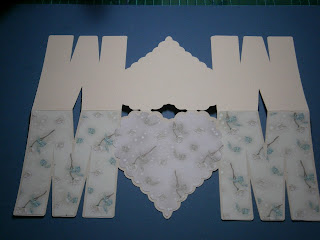
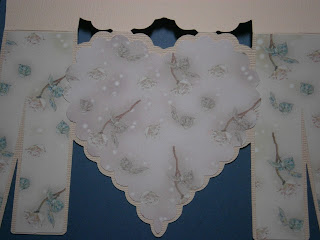
To make the flower embellishments ( I got this idea from Denise of Purple Paper Paradise ) using your fundamentals one flower section image 4, cut out of contrasting card 4 flower shapes 2" wide and high and then out of your backing paper 4 flower shapes 1.5" wide and high.
Now using the same flower reduce the size to 1.5" and cut out 4 of these using your backing of choice. Then glittered the outside edge of all the flowers.
Staring with your larger flower using your Ultimate Pro and boxer board score all the lines indicated on all 4 flowers. Then do the same with your small flowers.
Cut along one of the score lines in each flower to the centre and fold your score lines first starting with a mountain fold. Burnish. Now do the same with your smaller flowers.

Take two of the larger folded flowers and on one flower put some glue onto the first two folds.
Now place the first two folds of the other flower on top. Repeat this on the other side to make one complete flower. Make up the remaining flowers the same so that you have two larger flowers and two small.
Leave these to dry. I then cut a 1" circle of card and glued this to the back of the larger flower, this just enables you to arrange the mountain and valley folds and they will stay in place. Once this has dried glue your smaller flower on top. Glue a gem into the middle of the flower and attach to your card. Now matt and layer the letter U and place in the middle of the heart.


Thank you for popping over to my blog, hope you enjoy making this as much as I did
Pam x

Friday, 25 May 2012

Todays the Day for the Launch of Meadow Cottage Bears

Well another fantastic sunny day and also the launch of the Meadow Cottage Bears from Crafters Companion on Create and Craft at 12 o'clock for the Pick of the Week. This is another stunning collection from the very talented Chrsitine Haworth so don't forget to tune in. So thought I would share with you another sneak peek, sorry I didn't do one yesterday but had to take my son to the hospital for this first check up and then we spent the rest of the day together which was fantastic, had a lovely time.

Wednesday, 23 May 2012

Meadow Cottage Bears Another Sneak Peek

Morning all well another beautiful sunny day and hope you all have time to enjoy it. Well its not long now until the amazing launch of the Meadow Cottage Bears from Crafters Companion on Friday at 12 o'clock on Create and Craft, this is another fantastic CD and stamps from the lovely Christine Haworth. So here is my sneak peek for today :


Thanks for stopping by

Pam xx

Tuesday, 22 May 2012

Another Sneak Peek for the Meadow Cottage bears

Wow what a lovely sunny day it is today got all my washing out but not really got much planned for the rest of the day, but hope you all have time to enjoy the beautiful sunshine. Well today I am going to share with you another sneak peek from the amazing Meadow Cottage Bears CD that Crafters Companion are launching on Create and Craft on Friday at 12 o'clock so be sure not to miss it.


Oh and don't forget to go over to the Crafters Companion Blog here and you could win the new CD-ROM, the new Reddy die-cut decoupage kit and two new Meadow Cottage Bears Hunkydory papercrafting collections (with a total value of £58.96!)

Thanks for stopping by and good luck

xx

Monday, 21 May 2012

Crafters Companion Blog Hop !!!!!


Welcome to the Crafter's Companion Blog Hop Scavenger Hunt to celebrate the release of Meadow Cottage Bears, designed by Blackburn-born illustrator and figurative artist Christine Haworth!

If you have landed here from Crafters Companion New,Views and Inspiration Blog then you are hopping in the right direction. If not then you need to pop over the Crafter's Companion News blog to begin.

Our Design Team have loved crafting with the new range from Crafter's Companion and celebrate the launch of this gorgeous new collection on Friday 25th May, we have decided to give you a chance to see some Sneak Peeks and also have the chance of winning a brilliant prize:

the Meadow Cottage Bears CD, Reddy die-cut decoupage kit and two Hunkydory papercrafting collections!

All you need to do to be in with a chance of winning this great prize is visit each blog in turn and then head to the Competitions page on the Crafter's Companion web site (you must be logged in to view this page). Each blog along the way will give you a clue, which will direct you to a product on the Crafter's Companion web site. Within this product you will find an image of a member of the Crafter's Companion Team, with a letter. Make a note of the letter and then head back to the blog to follow the hop to the next blog. Enter the phrase the letters make into the Competition page before 9am on Friday 25th May.

The winner will be drawn after 10am on Friday 25th May, and will be notified by email.

Your clue is:

Which CD features beautiful images by the same person as Meadow Cottage Bears?

When you've found your letter, hop on to Marianne's blog.

Good luck!

Sunday, 20 May 2012

Butterfly Easel Card using yourt Ecraft Machine

Hi all today I thought that I would share with you a project that I made a few months ago. I made this for my MIL for Mothers Day, but it could be used for many occasions and is so easy to make.

Scrolls Frame Image from Ecraft.
Fundamentals 2
2 x A3 Centura Pearl Pastels (lilac) cardstock from Crafters Companion
1 x A4 Centura Pearl Darks (Purple) cardstock from Crafters Companion
2 sheets of Satin Finish paper from Crafters Companion
Crafters Companion Spring and Summer CD
Crafters Companion Autumn Winter CD
1 x Printable Light card white by Crafters Companion
Ultimate
Crafters Companion Stick and Spray
Glue
Gems
Glitter
Quickie Glue Pen
Bone folder
PLEASE NOTE TO SEE THE SCREEN IMAGES BETTER JUST CLICK ONTO IT TO ENLARGE.


Bring the image onto your mat and separate the two images. Copy and paste the Scroll Frame and put onto a new mat. Going back to the mat with both images on, delete your scroll frame image and working with the base image click onto the Aspect Ratio button and alter the size to 6.00" wide by 6" high. Now with your chosen cardstock cut out three of these.


Working still with the base image again making sure your Aspect Ratio button is on alter the size to 5.75" by 5.75" and cut two of these from your contrasting paper. I used the Crafters Companion Spring and Summer CD Design 4 Colour 4.

Now go back to the mat with the scroll frame image and again ensure that the Aspect Ratio is on alter the size to 5.75" by 5.75". Alter the draw feature to cut, your image should now turn from purple to black. Cut out from your cardstock.
Taking one of your card bases and using the Ultimate Pro score the lines as shown. Now fold your score lines and burnish.
Glue one of your paper bases to one of your unscored card bases
Taking your card base covered with your paper glue the smallest scored section as shown.
Using your Quickie glue pen draw around the edge of your remaining paper base and glitter, glue this to your last card base.
To make your Butterfly embellishment for your card take Fundamentals 2, image 12 and bring it onto your mat. Make sure that the Aspect Ratio is on and alter the size to 3.50" high by 3.62" wide. I used a darker cardstock for this. Cut out
For the top layer again using Fundamentals 2 but this time image 11, resize again to 3.50" high by 3.62" wide. I cut this from printable light card and used the Crafters Companion Autumn Winter CD, design 3 colour 3. Cut this out and using your Quickie Glue pen glitter the top butterfly.
Using your Ultimate Pro score both butterflies as shown and fold to give dimension.


Take your scroll frame and spray on the back with Crafters Companion Stick and Spray and place on your card topper. Decorate with gems.
Glue the spine of your top butterfly and stick to the butterfly base, add gems. Using the same two butterfly images and using the same card and patterned card cut out two more butterflies at the size of 1.93" wide by 2.00" high, glitter and add gems, then layer together.
Attach the largest butterfly to the centre of your topper and the smallest butterfly to the bottom of your easel card to create the stopper.
Thank you for popping over to my blog, hope you enjoy making this as much as I did
Pam x