BLOGGER TEMPLATES AND TWITTER BACKGROUNDS

Pages

Monday, 5 December 2011

Tutorial for Hexagon Box using the ECraft from Crafters Companion

Well today I thought that I would share with you a project using the Ecraft from Crafters Companion, I just love this machine and the more that I use it the more in love with it I become. The beauty is that you do not need any sticky mats and for me this is a god send. This Trinket box ( I got the idea from Ustampforfun and altered it so that I could use my ecraft ) makes a lovely way to give a small gift for Christmas, so here goes :


You will need:
Fundamentals 2 cartridge
3/5 sheets of 12 x 12 Coredinations cardstock
Patterned Paper
Strong glue
Crafters Companion Boxer Board and small scoring tool.
4 round beads
Small pegs or paper clips
1 sheet photo copy paper
Cotton wool or padding


1. Using your ecraft cut out two 3" circles on your photo copy paper. Fold one in half and then half again.


2. You then need to cut out twelve 3" circles using your Ecraft machine from your coredinations card. Then taking your 3" circle cut from your photocopy paper, using your boxer board and small scoring tool score four sides where I have maked with a pencil line.


3. Now taking 6 of your 3" circles you need to transfer these score lines onto each one. I found that the easiest way to do this was to place the photocopy paper circle on top of one of your 3" coredinations circles and score them both together, this will then transfer the score line to the underneath circle, again using your boxer board and small scoring tool.


4. After scoring your 6 coredinations circles, attach them to each other at the side. Please ensure that you use a strong wet glue, I found it was best to attach one at a time and wait till it is dry before you attach the next one. I used a small peg or paper clip to hold them together whilst they are drying.


5. Once you have joined all 6 circles together, you then need to join the two ends together to form the box base, again using a strong wet glue and leave to dry. Then using your Ecraft machine and some of your coredinations cardstock cut out two hexagons, for this I used the shapes on my toolbar on the lefthand side of the screen. These need to be 4.11" wide by 4.00 high. Putting some strong glue on the tabs inside place your first hexagon inside the box. This is now how the inside and outside of your base will look.


6 . Now taking your other hexagon shape place wet glue around the edge and stick to the outside of the box base.


7. Now to make the lid. Take your second 3" circle of photocopy paper and fold in half, then fold the two outer edges into the centre.


8. On your piece of paper using your boxer board and small scoring tool score the lines where I have marked with a pencil.


9. Taking your remaining six 3" circles of coredination cardstock, score these in the same way as you did for the base.


10. Using a strong wet glue stick these sections together, let each one dry before sticking the next one, use a small peg or paperclip to hold in place. Once they are all stuck together stick the two ends together. Cut a piece of card to measure 3.25" by 2.25", score this at 1.50 and then at 1.75", this will be your hinge. Score this as shown and attach as shown.


11. Once this has dried, place your lid onto some coredinations cardstock and draw around the lid and cut out. Trim your seams and place some cotton wool or padding into the lid, this helps to give it some shape. Place glue onto the inside of your tabs, place your hexagon under the tabs and press down, this now encases your lid.

12. Attach the lid to the box base as shown


13. To decorate the inside of the lid I used the Fundamentals 2 cartridge. For the first layer using the Flower Shapes image 13 I cut this 3.50" wide and 3.50" high using green card. For the second layer I used red card and cut out image 14 again on the Flower Shapes, 2.74" wide and 2.56" high.


14. Now to decorate the outside of the box. For the base I cut 6 layers in green card 2" x 1.75" and then another six layer in red backing paper 1.75" x 1.50". Glue these together and stick them to the outside panels of the base.
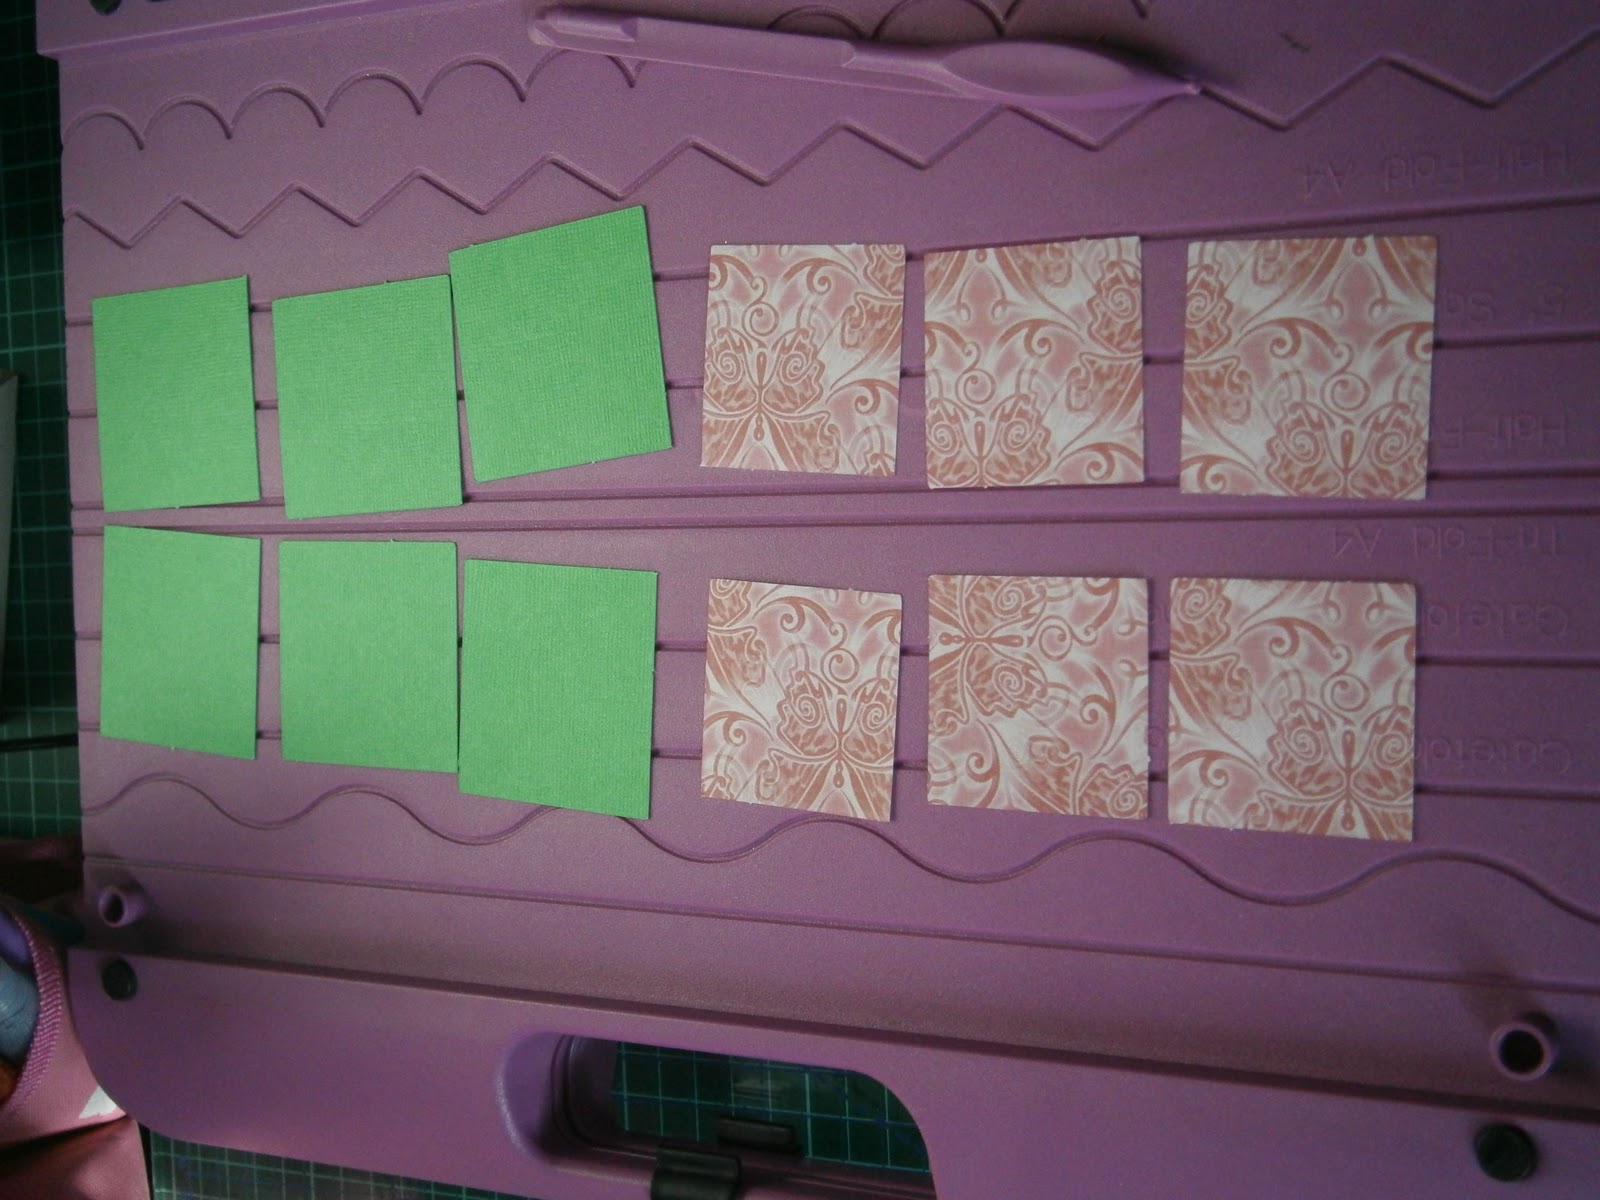


15. To decorate the lid and again using green card I cut 6 triangles 1.91" wide by 2.32" high and 6 triangles in red backing paper 1.59" high by 1.99" high. For these I used the shapes on the left hand side tool bar. Glue these together and stick them to the outside panels of the lid.


16. To decorate the base panels again I used Fundamentals 2 cartridge, Flower shapes. I cut 6 pieces from image 13 1.76" wide by 1.27" high, from green card. I then cut 6 pieces from image 14 1.27" wide by 1.28" high from red card.


17. Now stick your 4 beads to the bottom of the box.

Tuesday, 8 November 2011

Sorry not been around

Hi, really sorry that I have not been around really don't know where the time has gone. I have been sorting out some new projects ready for my next DT work, so that I will be half way ready when I get the call. I have also been playing with my new toy, my Cricut Expression 2, I already have the Cricut Create but found that I need a larger area when making my projects, so as much as I love it I will have to sell it to get some of my money towards my Expression 2, but not such a hardship really. I am counting the days now to Crafters Companion Craftaganza, believe me I am so excited I think I will burst before I get chance to go :)

Today I thought that I would share with you a card I made using the Reddy Black and White  kit from Crafters Companion, this is such a beautiful kit and covers so many occassions.

Wednesday, 26 October 2011

Tutorial for Double Pop Out Card

Today I am doing a tutorial for Heather who asked if I would do one for the Double Pop Out card that I made as part of the design team for Crafters Companion using the Popcorn Pals CD-Rom. This card is really easy, but the decorating takes the time. You will need:


Ultimate Pro
7 sheets of A4 card
Backing Paper and Toppers
Popcorn Pals CD-Rom
Glue
Paper Trimmer
Martha Stewart Double Border Punch - Infinite Loops

You can make this card any size but for the above I left the length of the card but cut the width to 6", then
using my Ultimate Pro with the longest sides top and bottom I scored at the A4 gatefold line, then turning my card 180 degrees scored the same line again. You need to do this on all 6 pieces of card.


Now taking two pieces of the scored card stick flaps A & B together.


 You need to repeat this until you have 5 pieces of card stuck together in a row.


Now your two remaining pieces need to be stuck to the 3rd and 4th panels from the left. This is quite hard to show so I have done these to panels in a different colour. The easiest way I can explain it is if you start at the first small flap and say that is number one and the other side of that flap is number two, you need to stick your first piece of card onto flap 5 and the second one on flap 8. I really hope that this makes sense but please contact me if it does not make sense to you.


You now need to decorate each panel, then starting with the two middle pieces of card fold them both into the centre and then fold the outer panels towards the centre until it all folds together and looks like a piece of 6 x 6 card. I then add a piece of ribbon to use as a fastening and put my final topper on the front panel. I have tried to include as many photos as possible


Any problems please let me know.

FREE Humphrey stamp - yes that right !!!!

I hope that you have all been over to the Crafters Companion website and checked out their amazing deals for their Birthday week, they are 6 this week. With every order you place you will receive an exclusive Humphrey Corner stamp. With every order you will receive the Christmas Joy stamp, orders over £50 you will receive the Christmas Joy AND At Christmas stamps and with orders over £100 you will receive Christmas Joy, At Christmas AND A Present For You Stamp. Plus they have a different deal on every day. Today I thought I would share with you a card made with the Christmas Joy.


Tuesday, 25 October 2011

Oh I just love Molly Bloom

I am really sorry that I have not been around for a while but things have been abit hectic at home with one things and another and I have had a lot of DT work as well, which is always fun. Just a quick thank you to my lovely friend Jayne, who missed me and check up to see if I was ok, thanks hun xx.

Well today I am sharing with you a card I made using Molly Bloom stamps, I just love these stamps they are so cute.


I am entering this into the challenge for Paperlane - Glitz and sparkle
                                                          Paper Shelter - Anything Goes 

Thursday, 13 October 2011

Last Sneak Peak - Tomorrow is the Day !!

Well tomorrow is the day for the launch of the SWALK Winter Cheer CD-ROM and stamp set from Crafters Companion, oh I am soooo excited I know that you are going to just love it. One last reminder for you to enter the blog hop just pop over to the Crafters Companion News blog and start from there, now you would not want to miss out of winning the CD-ROM and 12 stamps sets now would you.

Last sneak peak and only ONE MORE SLEEP TO GO

Wednesday, 12 October 2011

SWALK Winter Cheer and Blog Hop

Well not long to go now, if fact only two more sleeps to the Pick of The Week launch for SWALK Winter Cheer from Crafters Companion on Create and Craft. You are just going to love this CD-ROM and set of 12 stamps, the only problem you will have is trying to decide what to use first. Oh and don't forget to enter the blog hop, where you can win the CD-ROM and 12 sets of stamps.

So here is my 5th sneak peak:

Tuesday, 11 October 2011

SWALK Winter Cheer 4th Sneak Peak and Blog Hop

Well as promised today and I going to show you another sneak peak and also I am going to give the details again for the Crafters Companion blog hop.


Now for the exciting bit, if you have landed here from Leann's blog then you are hopping in the right direction. If not then you need to pop over to the Crafter’s Companion News blog to begin.

Our DT have had a great time creating with the new ranges from Crafter’s Companion and to celebrate the launch of these stunning new collections on Friday 14th October we have decided to give you a chance to see some Sneak Peeks and also have the chance of winning a fabulous Prize:

All twelve new SWALK stamps and the co-ordinating papercrafting CD-ROM!

All you need to do to be in with a chance of winning this great prize is visit each blog in order and then go back to the Crafter’s Companion News Views and Inspiration Blog to leave your link on Mr Linky.  Along the way you will notice that each Blog will give you a letter - make a note of these as they will make a word which we will ask you for if your number is drawn by Random.Org on the morning of Friday 14th.

My letter is: K

From here, you need to hop to Marcea's blog.

PLEASE DO NOT TELL US WHAT THE WORD IS ON THE CRAFTER’S COMPANION NEWS VIEWS AND INSPIRATION BLOG, WE WILL E-MAIL YOU FOR THE ANSWER IF YOUR MR LINKY NUMBER IS DRAWN.

Good luck :)

Monday, 10 October 2011

SWALK Winter Cheer Yet another Sneak Peak

Well all here is todays sneak peak, oh I had such fun with these stamps, the only problem I had was knowing when to stop :). Hope you all have your pennies at the ready because believe me you really don't want to miss this one. However why not enter the Crafters Companion Blog Hop with a chance to win the CD-ROM and set of 12 stamps, see all the info below.


Why not visit the other DT blogs to have a look at their amazing cards and check out the details detail on how to enter the Blog Hop:

Now for the exciting bit, if you have landed here from Leann's blog then you are hopping in the right direction. If not then you need to pop over to the Crafter’s Companion News blog to begin.

Our DT have had a great time creating with the new ranges from Crafter’s Companion and to celebrate the launch of these stunning new collections on Friday 14th October we have decided to give you a chance to see some Sneak Peeks and also have the chance of winning a fabulous Prize:

All twelve new SWALK stamps and the co-ordinating papercrafting CD-ROM!

All you need to do to be in with a chance of winning this great prize is visit each blog in order and then go back to the Crafter’s Companion News Views and Inspiration Blog to leave your link on Mr Linky.  Along the way you will notice that each Blog will give you a letter - make a note of these as they will make a word which we will ask you for if your number is drawn by Random.Org on the morning of Friday 14th.

My letter is: K

From here, you need to hop to Marcea's blog.

PLEASE DO NOT TELL US WHAT THE WORD IS ON THE CRAFTER’S COMPANION NEWS VIEWS AND INSPIRATION BLOG, WE WILL E-MAIL YOU FOR THE ANSWER IF YOUR MR LINKY NUMBER IS DRAWN.

Good luck :)

Sunday, 9 October 2011

SWALK Winter Cheer 2nd Sneak Peak

Well I hope that you all entered the Blog Hop yesterday, this is an amazing chance to win the brand new SWALK Winter Cheer CD-ROM and 12 stamp sets from Crafters Companion, worth over £60 ! , if not then pop over to the Crafters Companion News blog. So without further ado here is my second sneak peak:


Why not visit the other DT blogs to have a look at their amazing cards and check out the details detail on how to enter the Blog Hop:

Now for the exciting bit, if you have landed here from Leann's blog then you are hopping in the right direction. If not then you need to pop over to the Crafter’s Companion News blog to begin.

Our DT have had a great time creating with the new ranges from Crafter’s Companion and to celebrate the launch of these stunning new collections on Friday 14th October we have decided to give you a chance to see some Sneak Peeks and also have the chance of winning a fabulous Prize:

All twelve new SWALK stamps and the co-ordinating papercrafting CD-ROM!

All you need to do to be in with a chance of winning this great prize is visit each blog in order and then go back to the Crafter’s Companion News Views and Inspiration Blog to leave your link on Mr Linky.  Along the way you will notice that each Blog will give you a letter - make a note of these as they will make a word which we will ask you for if your number is drawn by Random.Org on the morning of Friday 14th.

My letter is: K

From here, you need to hop to Marcea's blog.

PLEASE DO NOT TELL US WHAT THE WORD IS ON THE CRAFTER’S COMPANION NEWS VIEWS AND INSPIRATION BLOG, WE WILL E-MAIL YOU FOR THE ANSWER IF YOUR MR LINKY NUMBER IS DRAWN.

Good luck :)

Saturday, 8 October 2011

SWALK Winter Cheer Blog Hop

Hi all, and welcome to the Crafter’s Companion Blog Hop to celebrate the release of the SWALK Winter Cheer stamp range and papercrafting CD-ROM. Before I give you the info on the blog hop I thought I would share with you my first sneak peak. The image is from one of the lovely stamp sets and the flowers are from the CD-Rom.


Now for the exciting bit, if you have landed here from Leann's blog then you are hopping in the right direction. If not then you need to pop over to the Crafter’s Companion News blog to begin.

Our DT have had a great time creating with the new ranges from Crafter’s Companion and to celebrate the launch of these stunning new collections on Friday 14th October we have decided to give you a chance to see some Sneak Peeks and also have the chance of winning a fabulous Prize:

All twelve new SWALK stamps and the co-ordinating papercrafting CD-ROM!

All you need to do to be in with a chance of winning this great prize is visit each blog in order and then go back to the Crafter’s Companion News Views and Inspiration Blog to leave your link on Mr Linky.  Along the way you will notice that each Blog will give you a letter - make a note of these as they will make a word which we will ask you for if your number is drawn by Random.Org on the morning of Friday 14th.

My letter is: K

From here, you need to hop to Marcea's blog.

PLEASE DO NOT TELL US WHAT THE WORD IS ON THE CRAFTER’S COMPANION NEWS VIEWS AND INSPIRATION BLOG, WE WILL E-MAIL YOU FOR THE ANSWER IF YOUR MR LINKY NUMBER IS DRAWN.

Good luck :)

Tuesday, 4 October 2011

Tutorial Christmas Tag Card

Today I thought that I would share with you a card that I made using Crafters Companion Humphreys Christmas Collection. This is a lovely idea for a card and something that is abit unusual, so here goes hope you like it.


Tag Card

2 pieces of A4  Centura Pearl card
1 A3 Centura Pearl card
5 A4 sheet Mirri card
2 sheets of Backing paper
6 peices of white card
2 sheets of borders
Boxer Board
Border Punch
12 small brads
Ribbon
Humphrey Christmas Corner Double CD
Ribbon
6" x 6" insert
Photo Glue


1. Take two pieces of A4 card and cut them to 10" x 8" and with the longest sides top and bottom score 2" from the left hand side. Fold over and burnish your score lines.
2. Using your A3 card cut a piece 12" x 8" and score at 2" interviews, this is the piece that you attach your tags too. Fold this into mountain and valley folds and burnish all your score lines.

3. I have marked the next sections A & B to make it easier, place section B on top a section A, this then joins the front of your card to the piece that will hold the tags. Stick both pieces together.


4. Now to join the other side together, again I have marked them D & E, place D on top of E and stick together.


5 Using Mirri card and backing papers, a picture from the Frame Card section of the CD make the matt and layers for the front of your card. I also used a Martha Stewart punch and threaded some ribbon through.
6. Make another matt and layer for the inside of the card.

Printer out a 6" x 6" insert and add your verse, matt and layer this onto the last page of your card.

8. Cut 6  pieces of Mirri card 7⅞ x 1⅞ add a border to each one . Stick these onto the panels that the tags are attached to.

9. From your CD choose your design from the design sets and click onto Gift Tag/Banners. I have choosen to add the twelve days of Christmas to my tags, but you can use whatever you wish. I used Font size 22Font Festive and a font colour to match my design. You will need to print this out twelve times, as you only need one tag from each print I used both sides on my card. I choose two different colours from the design set, but again it is personal choice. Cut out your tags and attached a small piece of ribbon with a small brad. Then attach these to the concertina folds in the inside of your card, just adding your glue to only half of the tag.